How to use Google Tag Manager to maintain Google Analytics and other marketing tags
Managing code snippets and pixels on your website or app to measure traffic can be a little bit stressful, especially if you have a marketing team that constantly needs to make changes. Luckily, there are tools out there like Google Tag Manager that will make them a little easier to wrangle.
What is Google Tag Manager?
If you’ve ever worked with any kind of analytics software, or you have worked with a marketing team before, you’ve probably heard the word pixel thrown around. A pixel is literally what it sounds like, a 1×1 image that sends information to a server through an image request.
![]()
Though pixels are still common, many teams have moved towards small javascript snippets that sit right along side the rest of your HTML and will allow software like Google Analytics to run their own scripts on your page, sometimes even with a pixel backup in the event of a browser not running javascript.
![]()
These pixels and snippets work great, but when you’re dealing with a bunch of them and they all use the same data, it might seem like you’re just adding to an unmanageable mess of single use code snippets that never feel like they’re in the right place.
Google Tag Manager, or GTM, is a software solution to manage these pixels and snippets for you. To start, GTM works pretty much like any of those other code snippets, as it’s a code snippet itself, but where it shines, is you get to manage the rest of those pixels and snippets along with the flow of data inside GTM, leaving it to be the only snippet to manage within your code.
Why do I want to use it?
Less code changes, less deploys
Most of the time, if you’re managing these snippets in your code, each change will require another merge request and another deploy to get the changes out. Not only does this add more risk as you need to make yet another change to the code, this is additional time spent dealing with your deploy pipeline and making sure everything is working as it should be. GTM allows you to break outside of that flow giving you more flexibility to get changes out that could give some needed insight to help fix some UI errors or add a few bucks to the bottom line.
More manageable data flow
Wrangling all the different variables throughout your application, making sure they’re all available in the right spot, and keeping up with avoiding breaking any changes can prove to be challenging, making your code more fragile and prone to breaking. Google Tag Manager utilizes what they call a dataLayer, which essentially functions like an array of events that it listens to, that allows you to push or seed new data to make available within GTM itself. This means you’re funneling all of your variables to 1 spot in the code, letting whoever manages GTM do the rest by utilizing that data with peace of mind that your data flow won’t break after forgetting to update 1 out of 10 spots.
Ability to give marketers a little more access
This is an opportunity to free up some of your time by letting the marketing team deal with tag changes themselves rather than you being the middle man for them. Perhaps they need to adjust the ID for your analytics software or maybe they want to add Crazy Egg. With the right permissions (explained later), they can do all of the work and send the changes to you for review before publishing them.
How does this relate to Google Analytics?
There is no direct relation, but along with Google Analytics, GTM is another tool in the Google Marketing Platform and gives you immediate ability to more easily manage your Google Analytics installation. GA comes with prebuilt tags inside GTM that make it a breeze to set up.
What else can I use this for?
Google Analytics is just one of many code snippets this can be used for. Ideally, you’re not going to write your entire site here, but you have the capability of pretty much doing whatever you want on your own site as long as Google doesn’t deem it malware.
Some other use cases include:
- Traffic visualization with Crazy Egg or Hot Jar
- Conversion and remarketing pixels with Google Ads
- A/B Testing with Google Optimize or AB Tasty
- Client side error tracking (and logging them)
- GDPR compliance management
There are many baked in like the examples above, meaning you don’t even need to mess with code, just add the IDs or settings and go, but for whatever custom solution or tag you need, you can always set up the HTML manually.
Anything I need to know before jumping in?
Before jumping right in, let’s familiarize ourselves with a few key terms that will make this ride a little easier.
Tags
Tags in GTM are your pixels or code snippets. A tag includes a single instance of a contained piece of code that is used for one function.
Example: your Google Analytics snippet will be one tag and if you add Crazy Egg, that will be another tag.
Variables
A variable is a name that you give a predetermined or dynamic value. The variable can be based on a variety of different things, hence the name “variable”, but this will function as a single name that you can give and reference that will never change when using it.
Example: we’ll set up your Google Analytics ID as a variable, meaning you’ll use that variable within the GA tag itself. If you ever need to update that ID, you won’t need to modify the tag or any other tags that use the variable, you’ll only need to update the variable itself.
Triggers
Triggers are the event or action that make your tag fire or load. This can happen in a variety of ways, such as when all or a specific page loads, when something is clicked, or a completely custom event you fire with Javascript.
Example: when we set up Google Analytics, our trigger will be when any page loads.
Container
GTM allows you to manage multiple “containers” or groups of tags within your organization. This is helpful when you have one company with a few different website properties.
Example: you’re a small company under a parent company. The parent company wants to maintain one organization, but each smaller company gets their own container, as they have their individual needs for tags and code snippets.
How do I get set up?
Getting your account set up
The first thing you’ll need to do is get your account set up. After wondering to the tag manager homepage, you’ll probably want to use your preexisting Google account. If you’re in an organization setting it up for the organization, you most likely want to use your business email, otherwise your personal account works okay too.
Next, create a new GTM account:

Once there, fill out the form appropriately. The Account Name should represent the top level of your hierarchy and the container name should represent the specific installation instance.
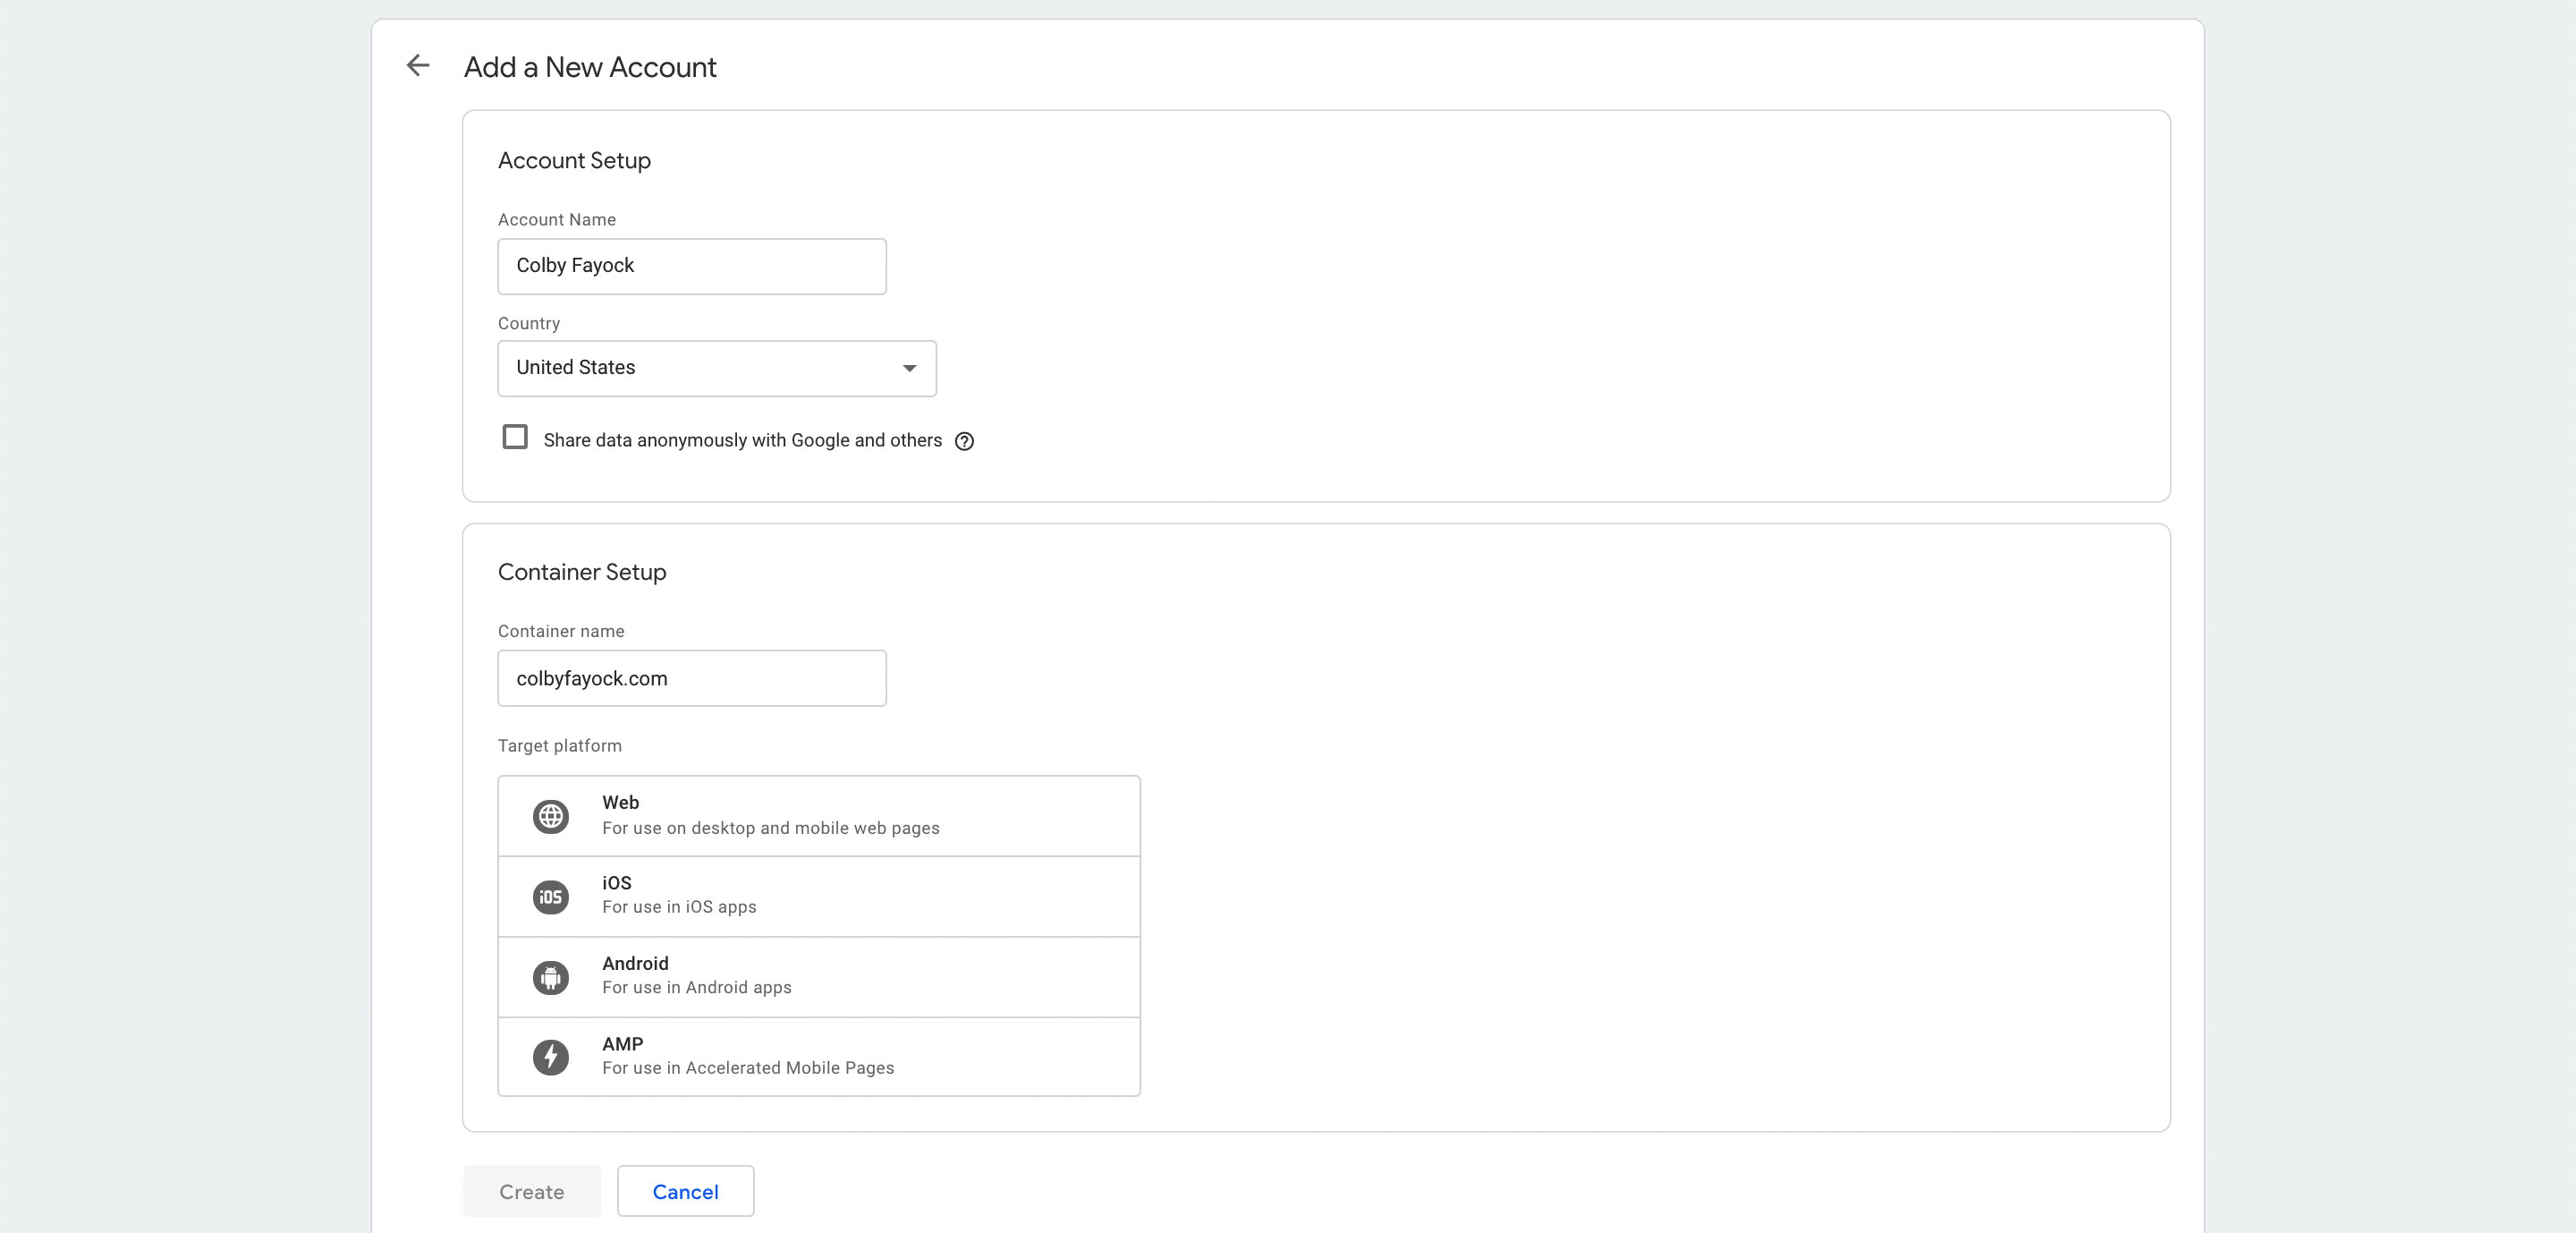
As for the target platform, choose whichever makes sense. If it’s a website or web app, Web makes the most sense here.
Finding and installing your snippet
As soon as you accept the terms and hit create, you’ll be presented with a snippet in a little modal. You'll want to do exactly what it says and install the snippets per the instructions.

Didn’t get the screen or accidentally exited out? You can find your snippet again by navigating to Admin in the top navbar and then click Install Google Tag Manager under Container to the right.
Testing that it’s working
To make sure it’s working, let’s verify a few things:
- We created our account
- We created our container
- We installed the Google Tag Manager snippets on our page and the change are live
Once all of those things are true, go ahead and click the Preview button in the top right of the page.

If successful, you’ll now see an orange banner at the top of the page that says you’re in Preview Mode:

Now wander over to the website that you installed GTM on and you should now see a banner at the bottom of the page, which will serve as your Debugger for working with GTM’s Preview.

You should see something similar to that, which means it worked! 🎉
Note: if you have an ad blocker on, similar to GA, you may need to disable it on the page you’re installing on in order to see it working.
Cool, it’s working, what about Google Analytics?
Now that we have a basic installation of GTM working, let’s set up Google Analytics. First we'll want to do some prep, so let's jump back over to the Tag Manager dashboard.
Create a settings variable
Navigate to Variables in the left sidebar and then click New beside User-Defined Variables.
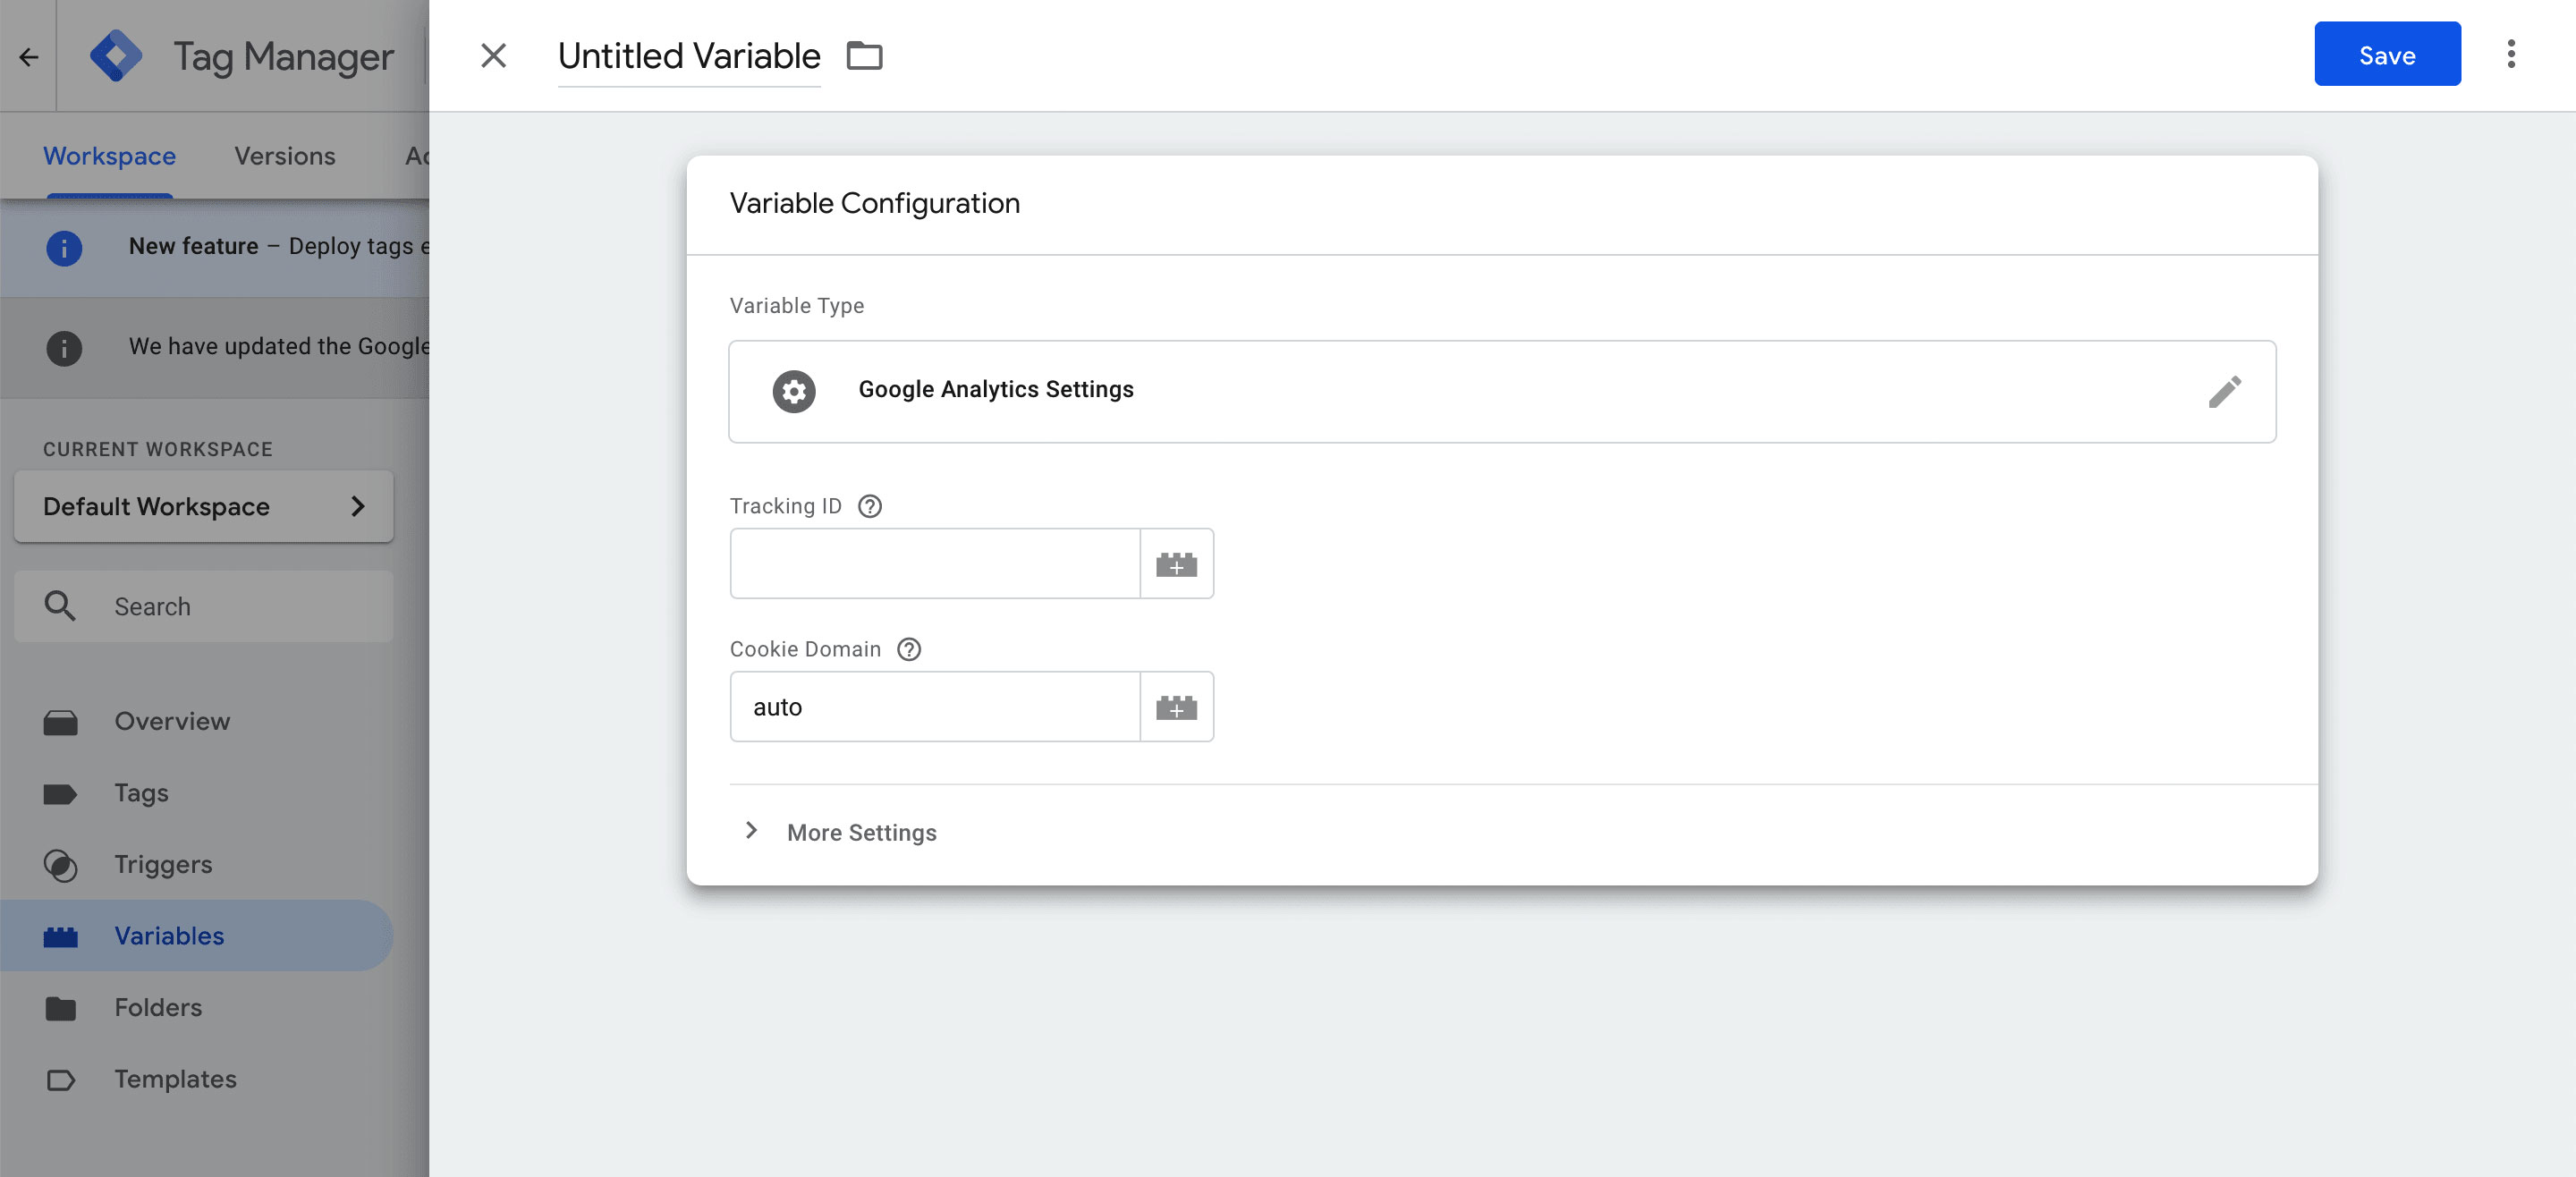
For the name, enter “GA Settings” and under Variable Type, click through and select Google Analytics Settings. Enter your Google Analytics Tracking ID (or Property ID) in the appropriate field, and finally click Save, at which point you have your new settings variable.
Create a new GA tag
Navigate to Tags in the left sidebar and then click New beside Tags.
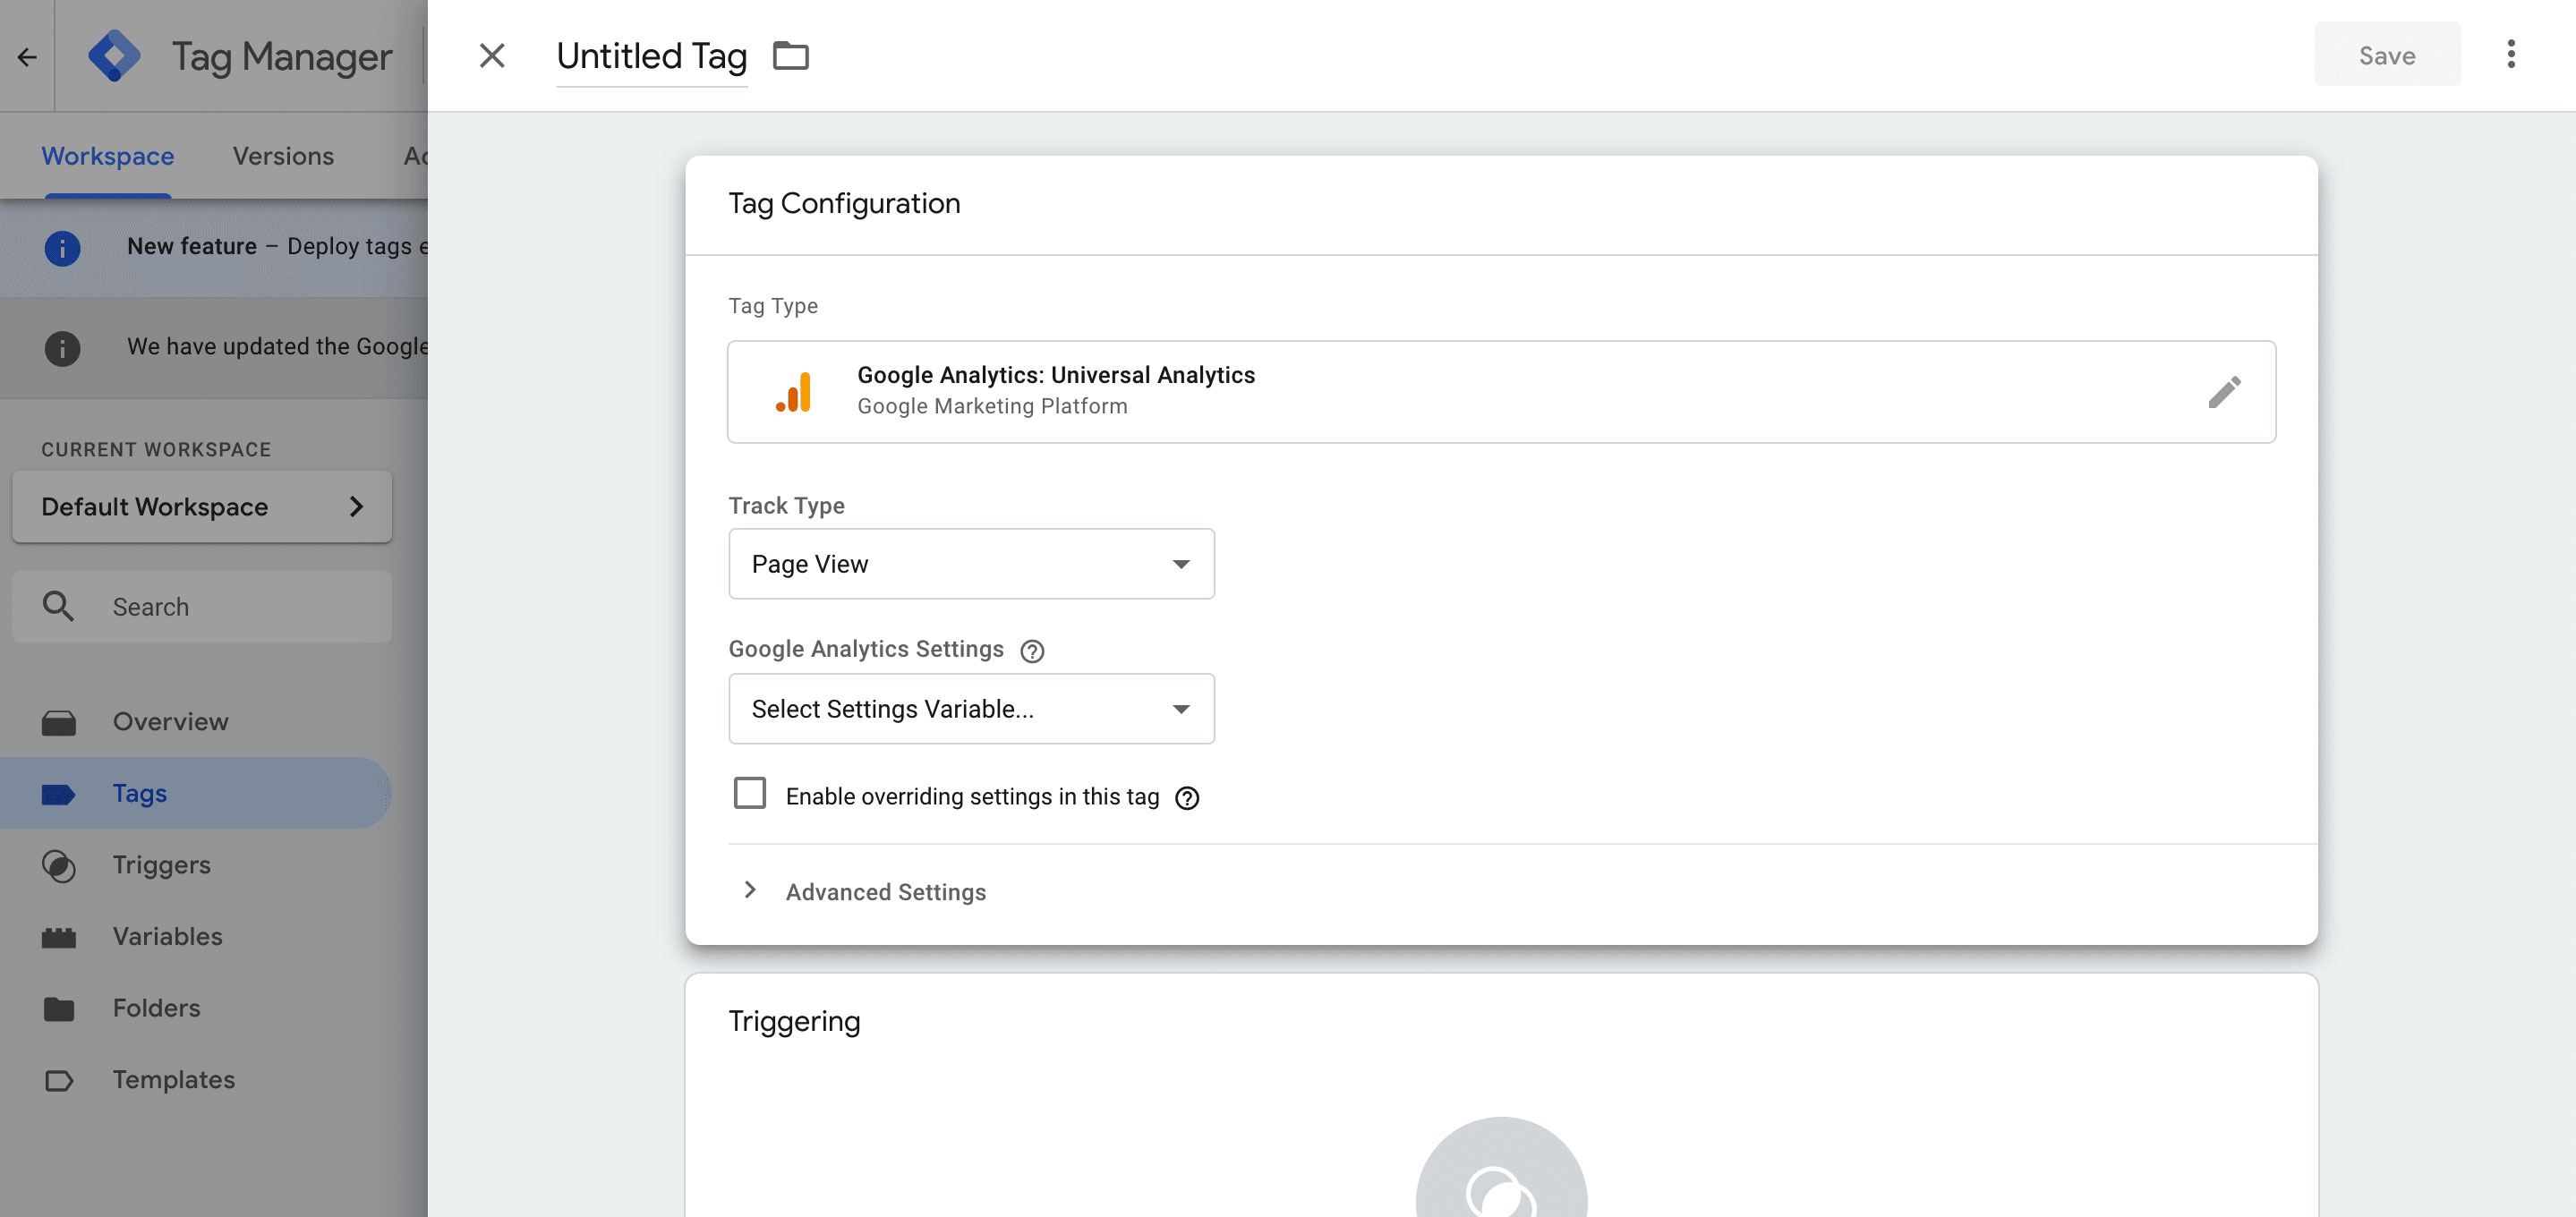
For the name, enter “GA – All Pages” and under Tag Type, click and select Google Analytics: Universal Analytics in the panel that pops out from the right.
After selecting the tag type, under Google Analytics Settings, select your variable from the previous step, which if you followed along will be called “GA Settings”.
Next, click in the middle of the Triggering box, which should open a new UI to select a trigger.
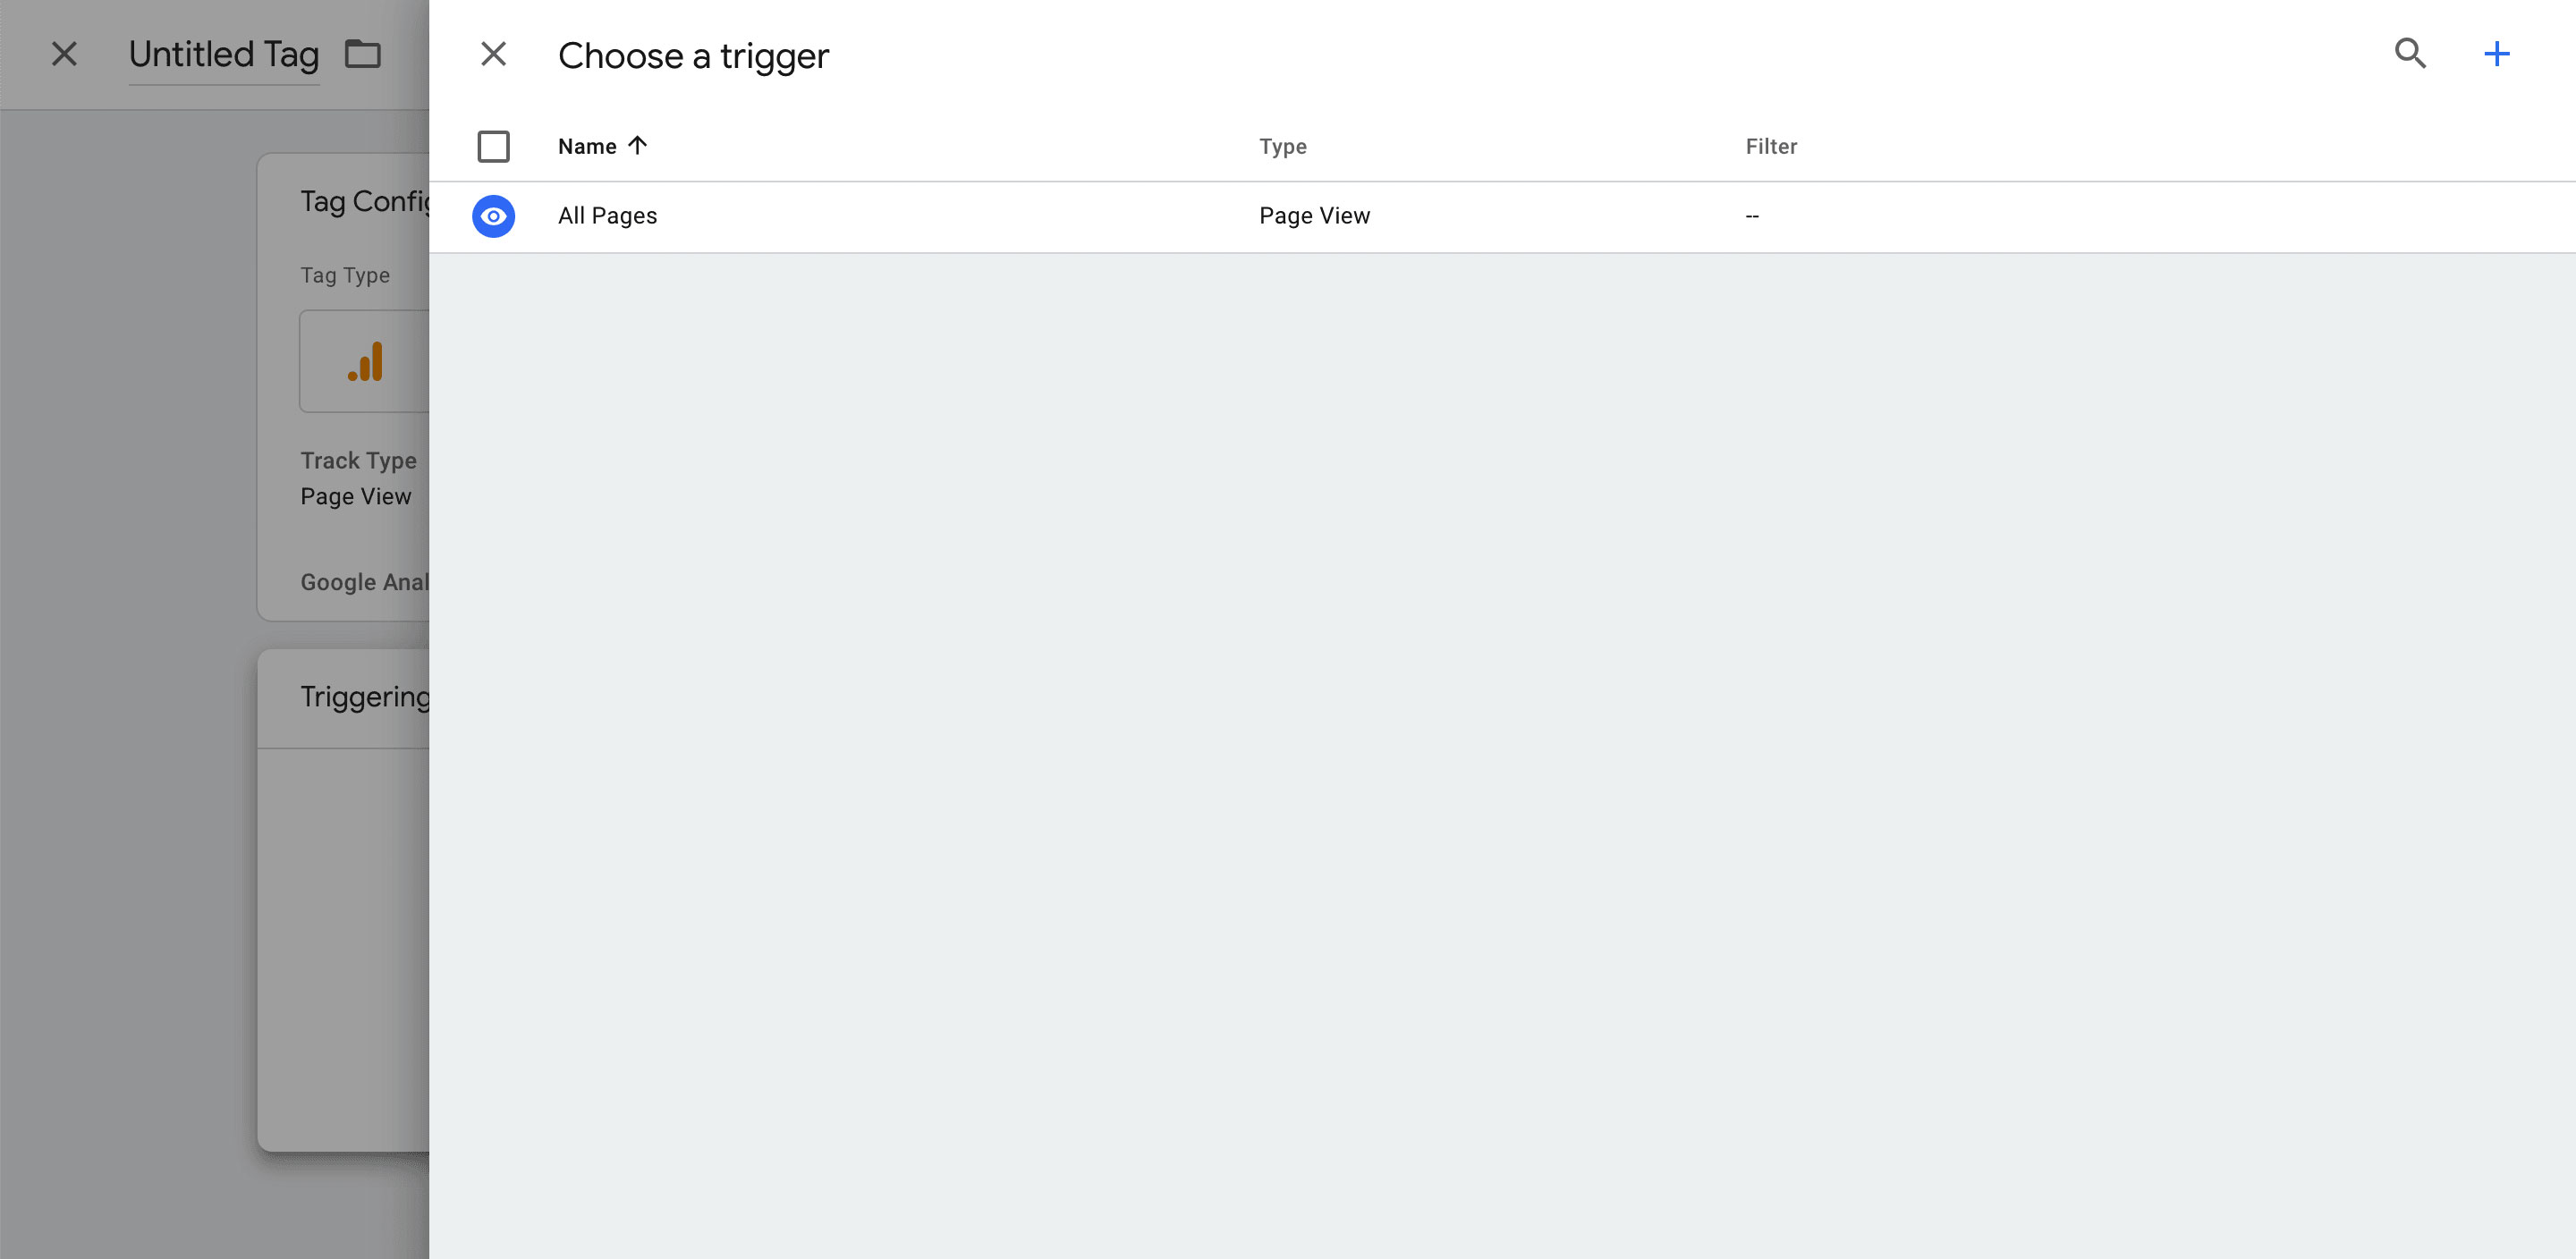
Select All Pages, which should be the only Trigger there if you’re in a new account, which will take you back to the New Tag UI with your newly selected trigger.
Once the above is done, click Save in the top right of the UI which will then save and create your new Google Analytics tag.
Test that GTM is working
Similar to when we installed GTM to begin with, let’s go back to the Workspace home, but clicking Overview in the left sidebar, and click Preview at the top right.
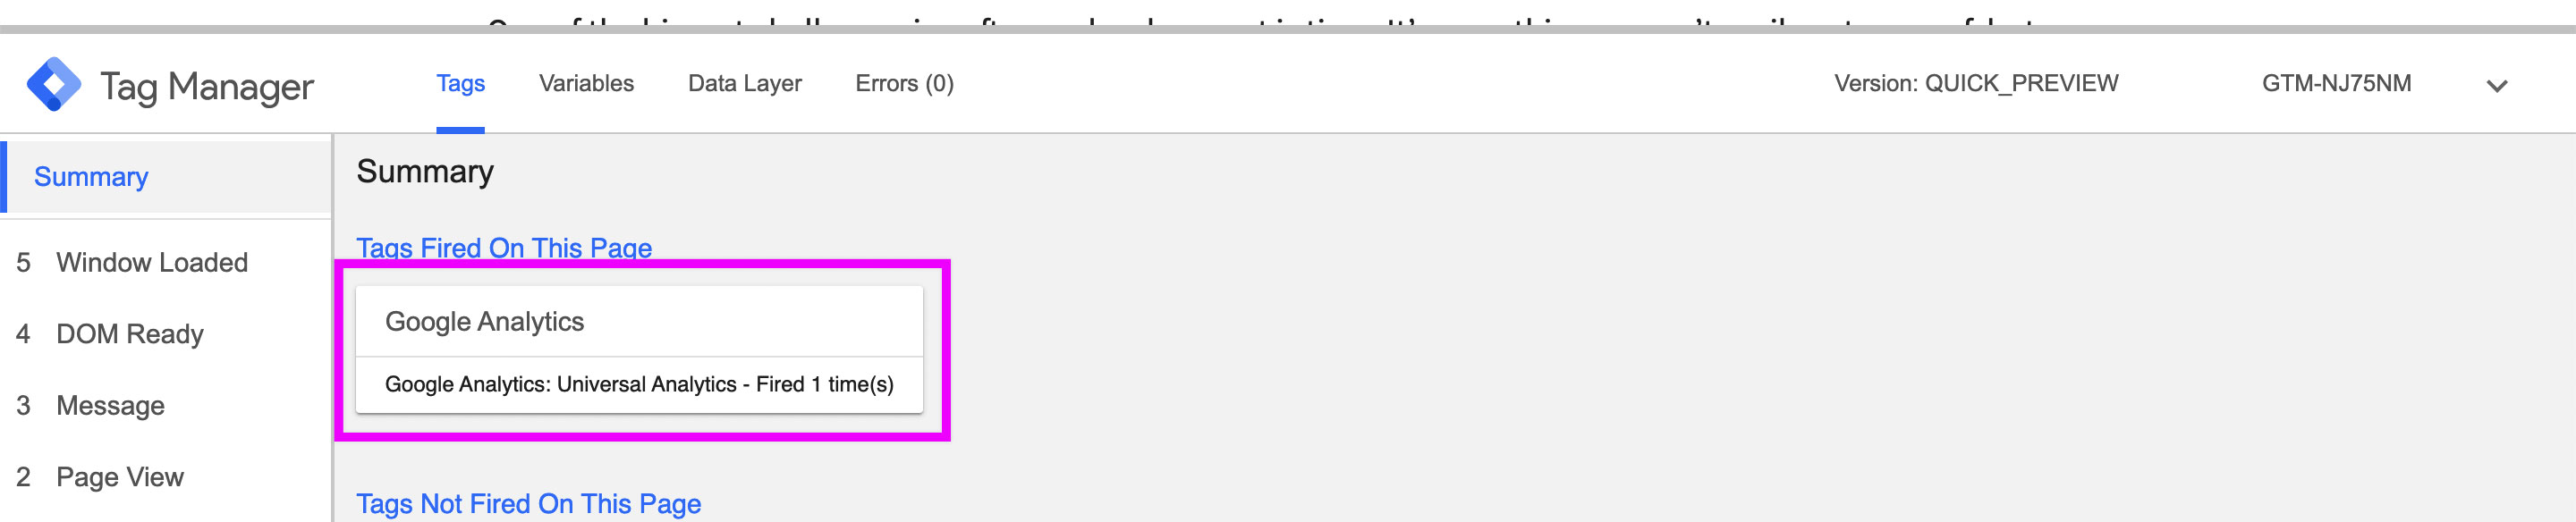
Open up your page GTM is installed on and you should once again see your Debugger, but this time with the Google Analytics Tag loading.
Are we done yet?
Not quite, though we have GA working, we need to tweak the configuration to make sure GA and GTM work right together.
Updating the page snippet
Let’s dig into the code one more time to update our Google Analytics and Google Tag Manager snippets.
The issue with the installation that we set up here, is we installed GA through the GA instructions and GA inside GTM, which means we have GA installed twice. What will happen in practice, is GA may send 1 pageview from your default installation and then another via GTM. To avoid this, we want to remove the pageview from the default GA snippet.
If you just have a super basic default installation, I did the work for you and you can go ahead and copy the snippet below, replacing [YOUR GA PROPERTY ID] with your GA Property ID and [YOUR GTM CONTAINER ID] with your GTM Container ID, and swapping it out for your existing GA and GTM installation on your page.
<script>
// Set up an initial dataLayer configuration
window.dataLayer = window.dataLayer || [{
"gaPropertyId": "[YOUR GA PROPERTY ID]"
}];
// Configure gtag and your GA ID
function gtag(){dataLayer.push(arguments);}
gtag('js', new Date());
gtag('config', '[YOUR GA PROPERTY ID]');
// Google Tag Manager snippet
(function(w,d,s,l,i){w[l]=w[l]||[];w[l].push({'gtm.start':
new Date().getTime(),event:'gtm.js'});var f=d.getElementsByTagName(s)[0],
j=d.createElement(s),dl=l!='dataLayer'?'&l='+l:'';j.async=true;j.src=
'https://www.googletagmanager.com/gtm.js?id='+i+dl+'>m_cookies_win=x';f.parentNode.insertBefore(j,f);
})(window,document,'script','dataLayer', '[YOUR GTM CONTAINER ID]');
</script>
This should REPLACE your current Google Analytics snippet if you have one. If you don't, this should go as far in the top of your <head> tag as you can, but under the charset meta tag.
For more advanced users, just make sure you’re not sending duplicate pageviews or duplicate events between the page snippet and any GTM tag you create.
Test that GA is working
Follow the steps above to make sure GA is showing up with the debugger.
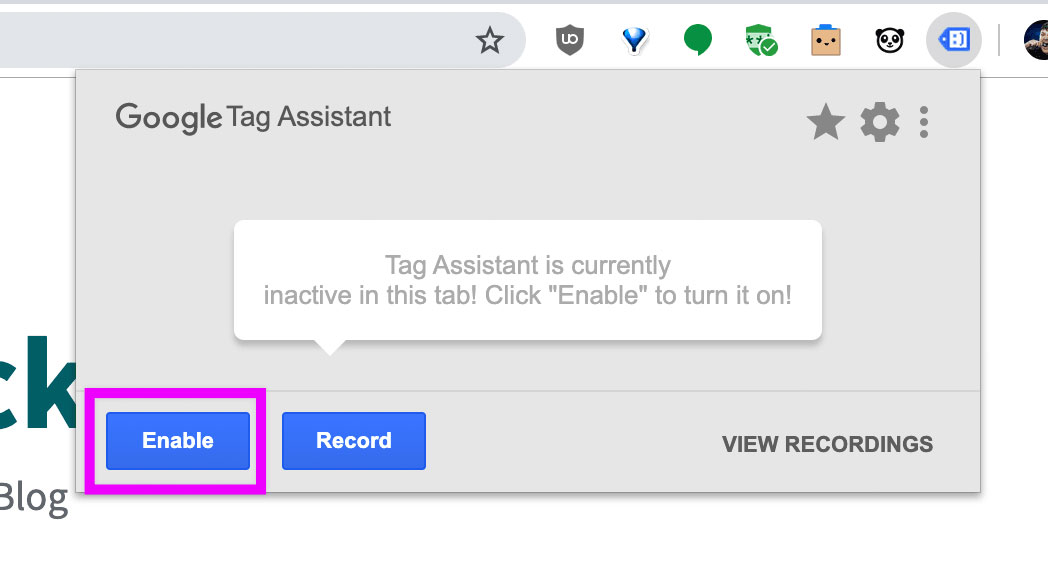
The final thing you’ll want to do is make sure your installation is working using Google’s Tag Assistant extension. Once you install the extension, go back to your page and click Enable in the Extension’s UI.
Refresh the page and you should see 2 tags, GA and GTM.
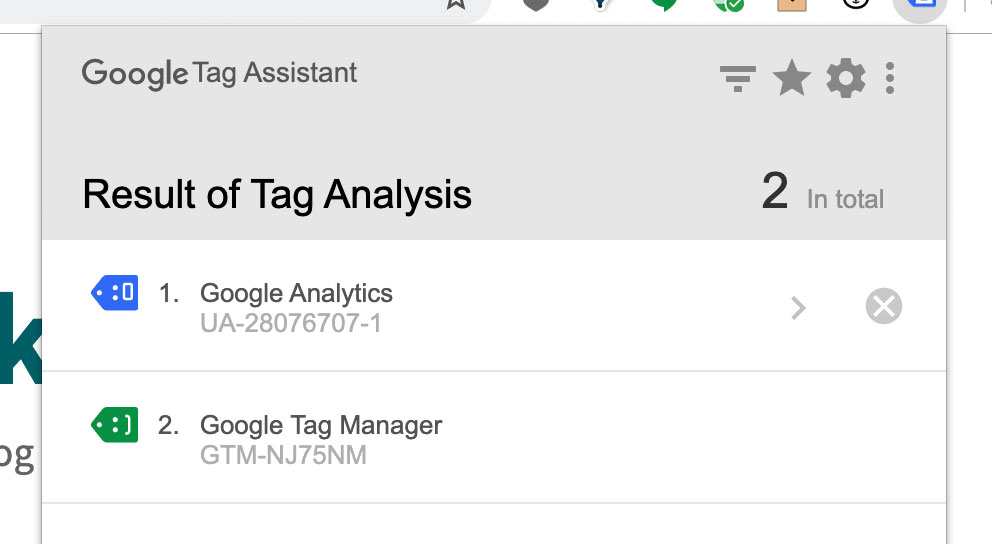
If you notice my GA tag is blue and yours may be too. Click in to Google Analytics for more info.
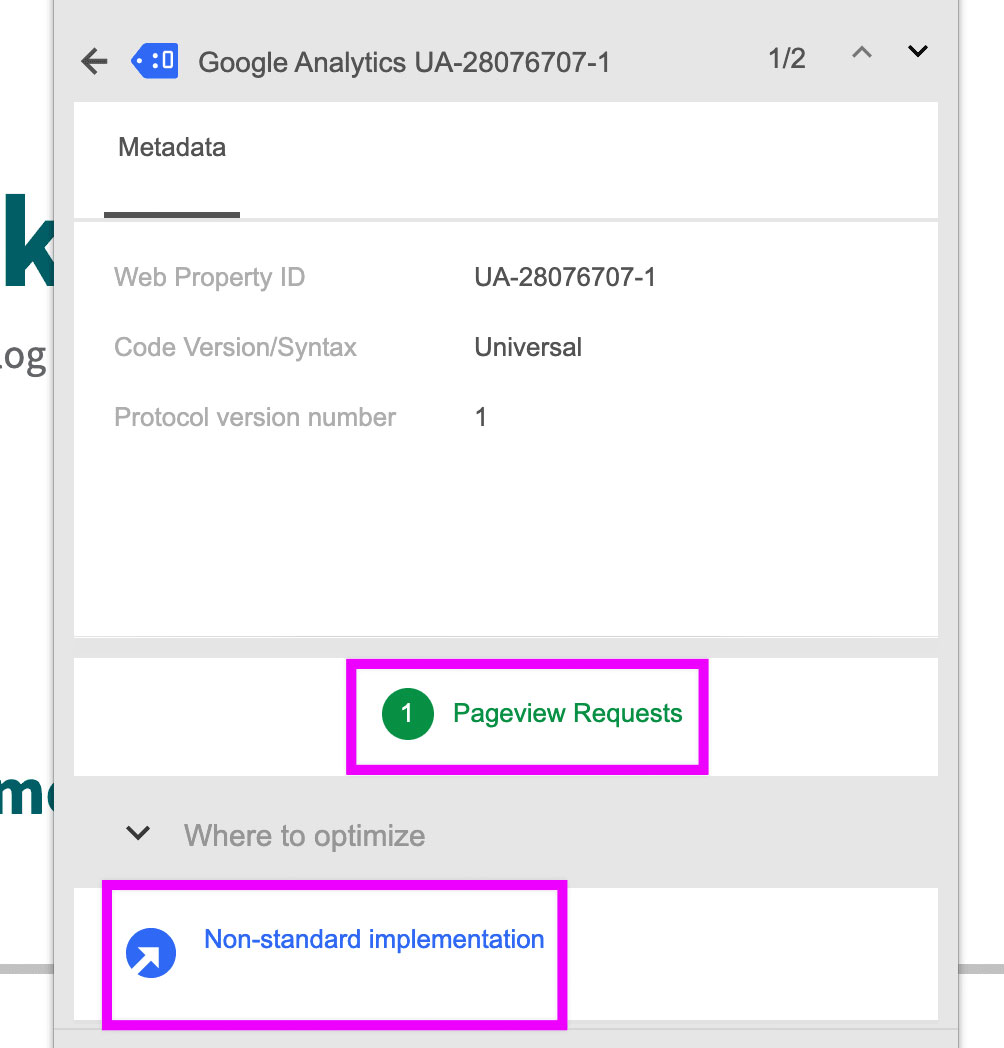
As you can see, we have a healthy 1 Pageview Request and a note that says Non-standard implementation, hence the blue, which is because we installed it with GTM instead of the default on page.
Publish and Deploy!
We’re there! Last step is to Publish your Container and make the changes live.

Click Submit in the Overview UI, enter a name and description.
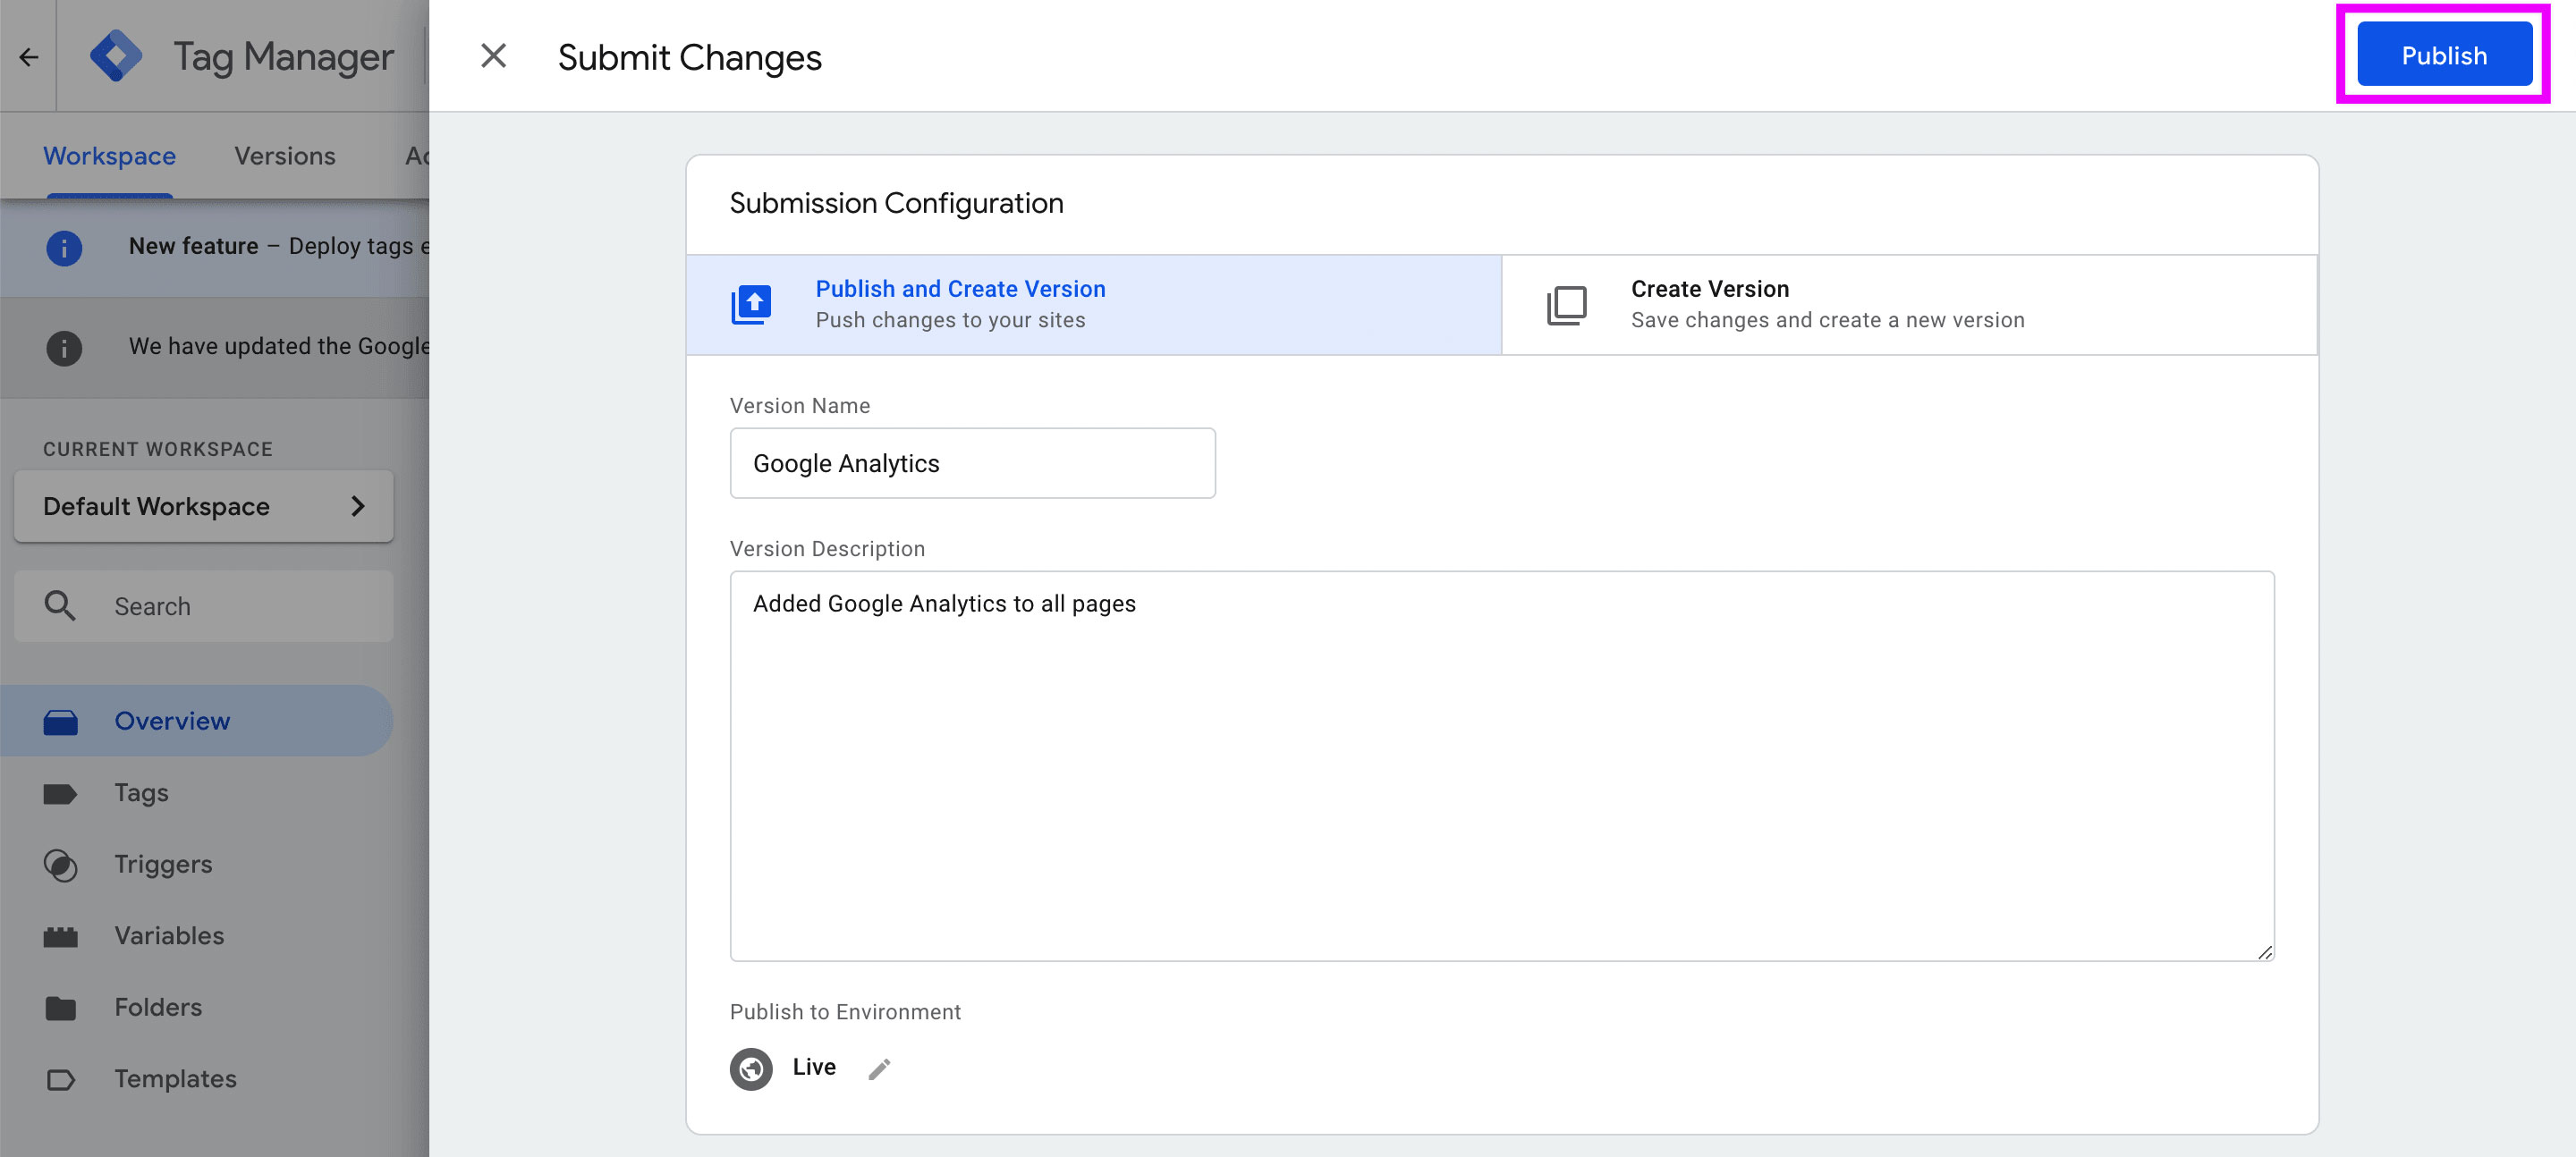
Finally click Publish and your changes will be live on your site!
What else do I need to know?
There’s plenty more to talk through, but that’s for a different day. There are a ton of resources online to get you started with adding your own new tags and exploring the capabilities of Google Analytics, but here are a few points to keep in mind with GTM.
Permissions
You most likely don’t want every marketer on your 1,000 person team to have publish access to your GTM container. It’s best to have one or a few people responsible for managing the container reviewing and publishing while keeping everyone to a lower access role. This will help prevent accidental changes or abuse within a bigger team.
Security
Permissions are your first step towards maintaining a secure installation, but Google takes this an extra step and performs some actions for you such as checking for code errors and scanning for malware. While this is great, it’s still important to keep an active review cycle of tags getting published just like any other pieces of code to make sure the site integrity and health is remaining in tact.
Conventions
I highly recommend starting early with naming conventions and best practices when configuring your tags, variables, triggers, and really anything within GTM. The different ways to name things can spiral out of control really fast depending on how many people are working in there which will make your work difficult to find, so it’s best to agree with the team on a convention to use early and get off on the right foot.
Single Page Apps
This doesn’t account for the impact single page apps have on a GTM and GA setup. The trigger we set up here will fire when any page loads, which is defined by a new page load by the browser. Single page apps don’t actually load a new page, rather, the javascript within the app makes it appear that a new page loads, so the trigger here will only fire the first pageview. Though it doesn’t include information directly usable in GTM, the GA documentation has some good information about tracking these types of apps.
GDPR
While GTM alone does not (currently) violate GDPR, you still need to be cognizant of how any of the tags you use impact your standing. This guide doesn’t touch this, so please make sure to do your homework.
Exiting out of Debugger
Stuck? One way is to clear your cookies, but you should always be able to go to the GTM Overview page and hit "Leave Preview Mode” right under the orange Preview Mode banner at the top of the page.
What's next?
From here, you can start managing your tags and pixels through GTM, allowing you to have a single source of consistent data flow into those tags. Experiment and use the debugger to play around as it opens the door for a lot of new ways to work with the marketing side of things.